 CAT DASH
Cat Dash levels 31–60: read the larger board
Read the transition from 8×8 to 9×9 boards without losing track of central cats whose exits cross several other bodies.
Checked against the current 100-level set · Updated October 11, 2026
Levels 31–40 still use an 8×8 board. The 9×9 board begins at Level 41 and continues through this range. Across levels 31–60 there are nine to fourteen cats, two to four opening choices, and five unblocking waves per layout. A larger board does not change the rule: check the straight line from a head to the edge.
Track dependencies, not just empty space
A central cat can face a row containing several different cats. Removing the nearest obstacle may expose another one farther away. Before tapping, count the different cats occupying the complete line; a long body can occupy more than one cell there but still represents a single blocker.
The numbered diagrams identify cats regardless of your selected artwork. Match the number in Keyboard play, or find the head using its one-based row and column. Breeds do not affect these sequences. The solutions show a legal order from a fresh board; you can make other safe choices.
Level 31: a final exit needs two separate pieces removed
Cats 7, 8 and 9 are initially free. Cat 7 starts a short upper sequence: Cat 5, then Cat 2. Cat 8 starts the lower sequence: Cat 6, Cat 4, then Cat 3. Cat 1 faces left from row 5, column 5, and its path initially crosses both Cat 3 and Cat 9.
In the example order, Cat 9 waits until the lower chain is finished. Removing it then frees Cat 1. You could instead remove Cat 9 at the beginning; Cat 1 would simply wait for Cat 3. This is why a different safe opening from the walkthrough does not mean you need to restart.
- 8×8 board
- 9 cats
- 3 opening choices
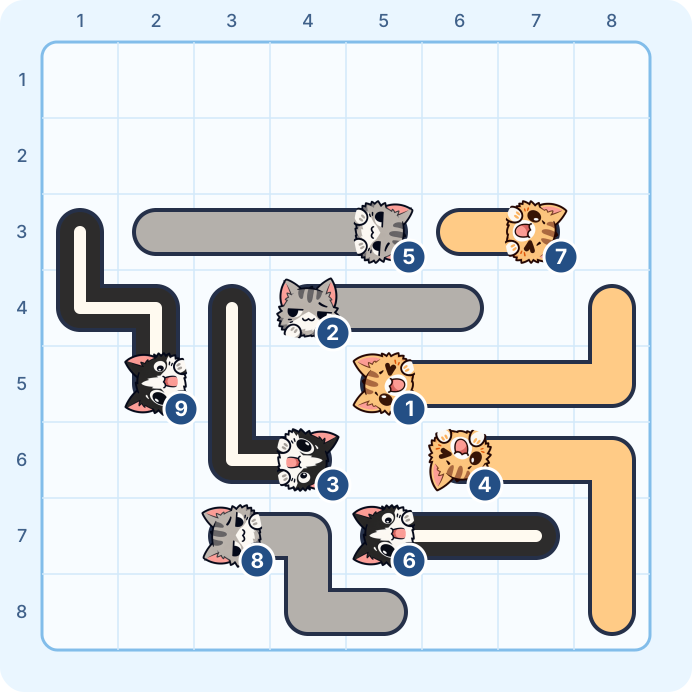
A safe start: Cat 7, Cat 8, Cat 9. You may choose any of these cats first.
Reveal one complete solution for level 31
Cat order: 7, 5, 2, 8, 6, 4, 3, 9, 1.
Follow this order from a fresh board. Each step is legal in sequence. “New exits” lists cats freed by that move; an already open exit stays available. Your coat colors may differ.
| Step | Cat and head position | Facing | New exits |
|---|---|---|---|
| 1 | Cat 7 Row 3, column 7 | Right | Cat 5 |
| 2 | Cat 5 Row 3, column 5 | Right | Cat 2 |
| 3 | Cat 2 Row 4, column 4 | Up | No new exit |
| 4 | Cat 8 Row 7, column 3 | Left | Cat 6 |
| 5 | Cat 6 Row 7, column 5 | Left | Cat 4 |
| 6 | Cat 4 Row 6, column 6 | Down | Cat 3 |
| 7 | Cat 3 Row 6, column 4 | Right | No new exit |
| 8 | Cat 9 Row 5, column 2 | Left | Cat 1 |
| 9 | Cat 1 Row 5, column 5 | Left | Board cleared |
Level 45: four blockers in one exit line
On this 9×9 board, Cat 1 faces right from the center at row 5, column 5. Its initial path is occupied by Cats 2, 3, 7 and 12. Treating Cat 1 as your first target invites a blocked move; work outward to the cats that can already leave: 8, 10, 11 and 12.
Cat 8 frees Cat 4 immediately, but Cat 2 still waits for Cat 5. Cat 10 frees Cat 9, which frees Cat 3. Cat 11 opens the sequence Cat 6, Cat 5, Cat 2. Cat 12 frees Cat 7. Once those branches are cleared, Cat 1's rightward line finally becomes open.
This example is a reason to follow full bodies instead of judging by the nearest face. A blocker can have its head on a different row while its middle or tail crosses the row you are checking.
- 9×9 board
- 12 cats
- 4 opening choices
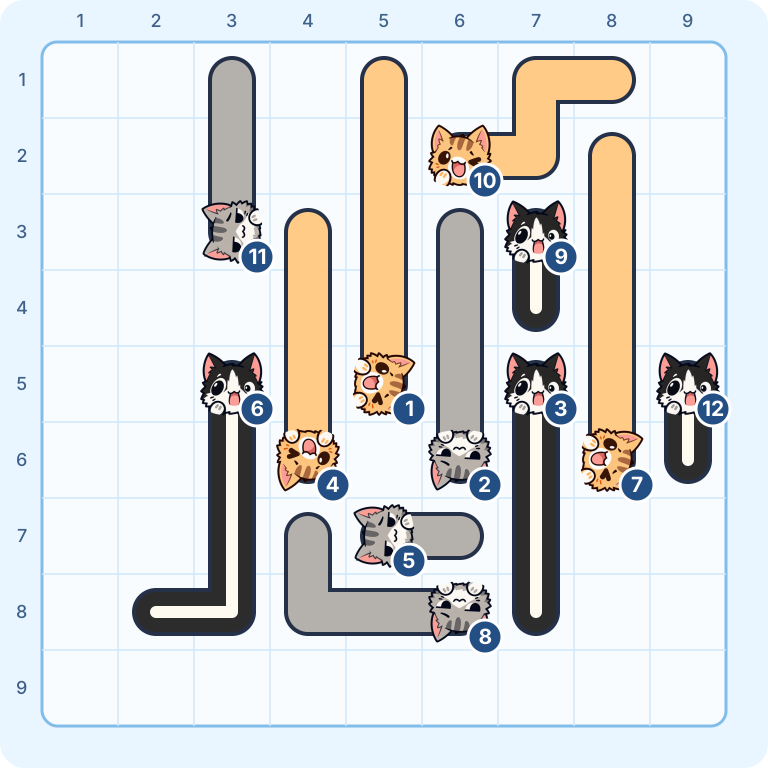
A safe start: Cat 8, Cat 10, Cat 11, Cat 12. You may choose any of these cats first.
Reveal one complete solution for level 45
Cat order: 8, 4, 10, 9, 3, 11, 6, 5, 2, 12, 7, 1.
Follow this order from a fresh board. Each step is legal in sequence. “New exits” lists cats freed by that move; an already open exit stays available. Your coat colors may differ.
| Step | Cat and head position | Facing | New exits |
|---|---|---|---|
| 1 | Cat 8 Row 8, column 6 | Down | Cat 4 |
| 2 | Cat 4 Row 6, column 4 | Down | No new exit |
| 3 | Cat 10 Row 2, column 6 | Up | Cat 9 |
| 4 | Cat 9 Row 3, column 7 | Up | Cat 3 |
| 5 | Cat 3 Row 5, column 7 | Up | No new exit |
| 6 | Cat 11 Row 3, column 3 | Left | Cat 6 |
| 7 | Cat 6 Row 5, column 3 | Up | Cat 5 |
| 8 | Cat 5 Row 7, column 5 | Left | Cat 2 |
| 9 | Cat 2 Row 6, column 6 | Down | No new exit |
| 10 | Cat 12 Row 5, column 9 | Up | Cat 7 |
| 11 | Cat 7 Row 6, column 8 | Right | Cat 1 |
| 12 | Cat 1 Row 5, column 5 | Right | Board cleared |
Level 60: one removal opens several useful routes
The starting exits are Cats 9, 11 and 12. Cat 9 moving up frees Cats 3 and 8. Cat 11 moving down frees Cats 4 and 10; Cat 10 then frees Cats 5 and 7. From there, Cat 5 opens Cat 2, while Cat 7 opens Cat 6.
Cat 1 needs both Cats 2 and 3 gone. Cat 12 is independent: it faces right from row 2, column 6 and does not initially block another cat. You can remove it whenever convenient. The walkthrough retains it until the end to keep the related moves together.
- 9×9 board
- 12 cats
- 3 opening choices
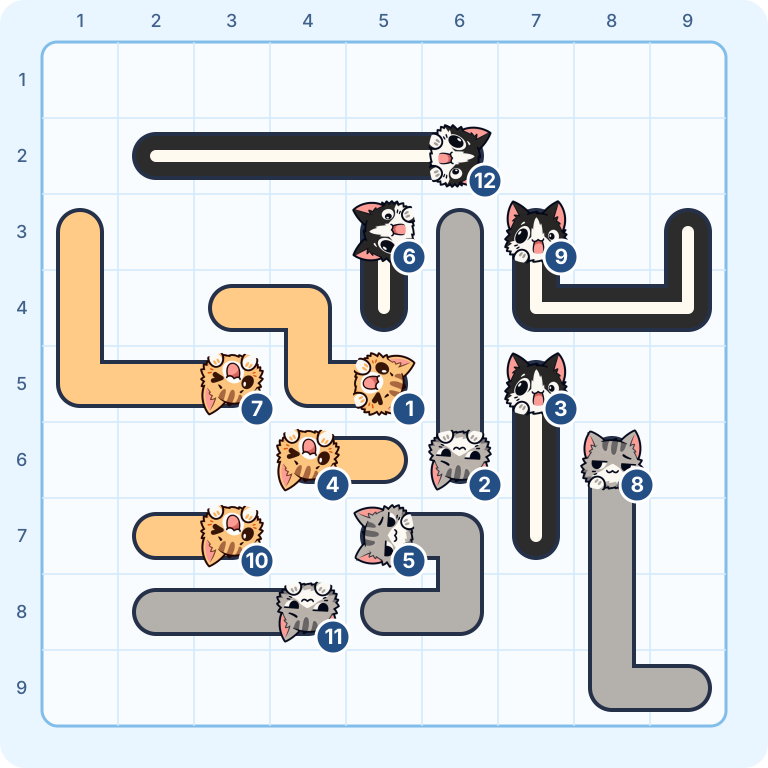
A safe start: Cat 9, Cat 11, Cat 12. You may choose any of these cats first.
Reveal one complete solution for level 60
Cat order: 9, 3, 8, 11, 4, 10, 5, 2, 1, 7, 6, 12.
Follow this order from a fresh board. Each step is legal in sequence. “New exits” lists cats freed by that move; an already open exit stays available. Your coat colors may differ.
| Step | Cat and head position | Facing | New exits |
|---|---|---|---|
| 1 | Cat 9 Row 3, column 7 | Up | Cats 3, 8 |
| 2 | Cat 3 Row 5, column 7 | Up | No new exit |
| 3 | Cat 8 Row 6, column 8 | Up | No new exit |
| 4 | Cat 11 Row 8, column 4 | Down | Cats 4, 10 |
| 5 | Cat 4 Row 6, column 4 | Down | No new exit |
| 6 | Cat 10 Row 7, column 3 | Down | Cats 5, 7 |
| 7 | Cat 5 Row 7, column 5 | Left | Cat 2 |
| 8 | Cat 2 Row 6, column 6 | Down | Cat 1 |
| 9 | Cat 1 Row 5, column 5 | Right | No new exit |
| 10 | Cat 7 Row 5, column 3 | Down | Cat 6 |
| 11 | Cat 6 Row 3, column 5 | Left | No new exit |
| 12 | Cat 12 Row 2, column 6 | Right | Board cleared |
Use a consistent scan on the wider boards
After a removal, first inspect the cats facing the cells it occupied. Then scan the remaining heads in a consistent order, such as top to bottom. This reduces repeated checks without adding a new game rule. If you lose your place, pause and inspect the board; there is no timer. Use a hint to learn an available exit, or replay without hints when aiming for three stars.
Move on to the final forty levels, revisit parallel-chain practice, or return to the wiki index.
Every level in this range
These facts come from the current board layouts. An unblocking layer is one wave of cats that can leave after the previous wave is removed. It describes the layout, not a star requirement or a minimum number of taps.
Show the 30-level reference table
| Level | Board | Cats | Starting exits | Layers |
|---|---|---|---|---|
| 31 · example | 8×8 | 9 | 3 | 5 |
| 32 | 8×8 | 10 | 3 | 5 |
| 33 | 8×8 | 10 | 3 | 5 |
| 34 | 8×8 | 11 | 3 | 5 |
| 35 | 8×8 | 10 | 3 | 5 |
| 36 | 8×8 | 11 | 2 | 5 |
| 37 | 8×8 | 10 | 2 | 5 |
| 38 | 8×8 | 10 | 3 | 5 |
| 39 | 8×8 | 9 | 3 | 5 |
| 40 | 8×8 | 11 | 3 | 5 |
| 41 | 9×9 | 14 | 4 | 5 |
| 42 | 9×9 | 13 | 4 | 5 |
| 43 | 9×9 | 13 | 3 | 5 |
| 44 | 9×9 | 13 | 4 | 5 |
| 45 · example | 9×9 | 12 | 4 | 5 |
| 46 | 9×9 | 14 | 4 | 5 |
| 47 | 9×9 | 11 | 4 | 5 |
| 48 | 9×9 | 14 | 3 | 5 |
| 49 | 9×9 | 13 | 4 | 5 |
| 50 | 9×9 | 14 | 3 | 5 |
| 51 | 9×9 | 13 | 4 | 5 |
| 52 | 9×9 | 14 | 4 | 5 |
| 53 | 9×9 | 14 | 3 | 5 |
| 54 | 9×9 | 14 | 4 | 5 |
| 55 | 9×9 | 12 | 3 | 5 |
| 56 | 9×9 | 12 | 3 | 5 |
| 57 | 9×9 | 13 | 4 | 5 |
| 58 | 9×9 | 13 | 3 | 5 |
| 59 | 9×9 | 14 | 4 | 5 |
| 60 · example | 9×9 | 12 | 3 | 5 |